
Hot Rubber Low Door Opening
Hot Rubber Low Door Opening
Revision as of 19:27, 7 November 2025 by James Klassen (talk | contribs) (Created page with "{{Template:RPM Info}} {{DISPLAYTITLE:<span style="position: absolute; clip: rect(1px 1px 1px 1px); clip: rect(1px, 1px, 1px, 1px);">{{FULLPAGENAME}}</span>}} __NOTOC__ <big>...")
Division D - Construction Details
Hot Rubber | Low Door Opening ( Article 10.3.4.5.)
| Notice to Reader | |
| Images used in a Construction Detail are representative and not prescriptive, and are not necessarily drawn to scale. They are intended to support the related Standard (Ref. Division A, Article 2.2.1.2.).
The reader may link to the related Article in the detail title, or link to the Standard as it relates to a specific element in the detail. All hyperlinks are displayed blue text. | |
SBS Details
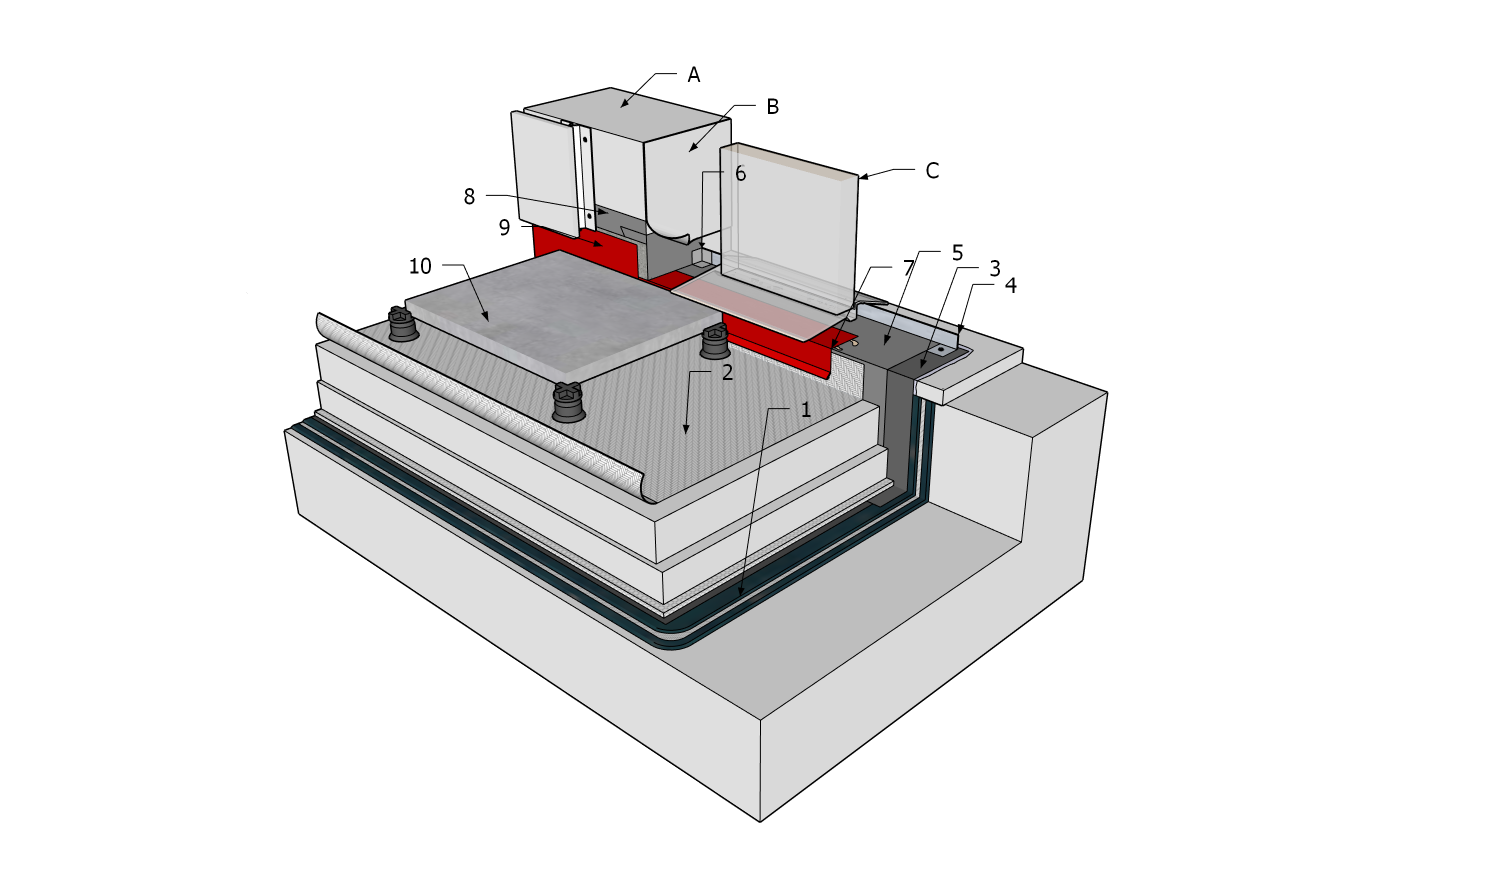
1 WORK INCLUDED
- (1) Field membrane
- Reinforced hot rubber system shown, including protection materials (see Part 9 for requirements)
- (2) Roof system
- Protected membrane system (from bottom: drainage layer, insulation (2 layers), filter fabric, pavers on pedestals). Note the location of the drainage layer and refer to Article 7.1.6.2. concerning this issue.
- (3) Self-adhered membrane (pre-flashing)
- Apply over rough sill or sill woodwork. Prime as required. When sheet membrane flashing is used, it shall conform to the RGC Standard and to the manufacturer's application requirements (see Part 10 for requirements).
- (4) Metal water-stop flashing
- Dimensions as specified in design. Mechanically attach to inside face of door sill. Cut flashing to fit opening width.
- (5) Membrane flashing
- Base membrane shown. Install to overlap and seal in metal water-stop flashing.
- (6) Membrane gussets
- Install in corners to seal joints.
- (7) Metal base flashing (under door)
- Optional; protection for membrane when pavers are installed (shown), or when exposed membrane is vulnerable to damage. Mechanical fasteners must be at least 87.5 mm (3-1/2”) above the drainage plane.
- (8) Membrane flashing
- Applicable for exterior-insulated walls. Seals roof membrane flashing to air/vapour barrier on wall and provides sufficient exposure for positive union with WRB (by others). Mechanically secure membrane (metal base flashing used for securement in this detail).
- (9) Metal base flashing (walls)
- Optional; protects membrane flashing from damage, and functions as removable panel to permit access to membrane flashing for future replacement.
- (10) Pavers and pedestals
- May be installed by others, if specified. See Part 14 for material and application requirements. Must be at least 12 mm (1/2”) away from other pavers, and from membrane flashing or metal base flashing, to permit adequate drainage.
2 RELATED WORK BY OTHERS
- (A) Wall and cladding
- Generic and representative only.
- (B) WRB (Water Resistive Barrier)
- Generic and representative only.
- (C) Door and jamb assembly
- Generic and representative only.
NOTE: See the Standard for additional requirements.
Back to Hot Rubber Roof System Details
© RCABC 2026
RoofStarTM is a registered Trademark of the RCABC.
No reproduction of this material, in whole or in part, is lawful without the expressed permission of the RCABC Guarantee Corp.