
Difference between revisions of "ASM Cylindrical Penetration (Split Panel Flashing)"
Difference between revisions of "ASM Cylindrical Penetration (Split Panel Flashing)"
(→WORK INCLUDED) |
|||
| Line 1: | Line 1: | ||
| + | {{Template:RPM Info}} | ||
| + | |||
{| class="wikitable" | style="color: black; background-color: orange; width: 100%;text-align:center" | {| class="wikitable" | style="color: black; background-color: orange; width: 100%;text-align:center" | ||
| colspan="2" | <big>'''''RoofStar Guarantee Standards''''' are <span style="color:#6495ed">'''blue-linked'''</span></big> | | colspan="2" | <big>'''''RoofStar Guarantee Standards''''' are <span style="color:#6495ed">'''blue-linked'''</span></big> | ||
Revision as of 22:01, 26 July 2021
| RoofStar Guarantee Standards are blue-linked |
ASM Details

- Click below for a printable version of this page.
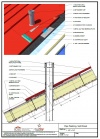
1 WORK INCLUDED
- (1) Deck overlay
- Required for continuous support of the underlayment when the deck is not suitable.
- (2) Underlayment
- The type of underlay required is determined by roof slope.
- (3) Insulation
- Offset and stagger layers 300 mm (12").
- (4) Vapour-permeable separation membrane
- Installed over insulation and required on all insulated Architectural Sheet Metal Roof Systems. The material must be located between the insulation and metal panels/ventilation material (see 8.1.2 Design).
- (5) Ventilation layer
- A ventilation space is required on slopes less than 1:3; entangled mesh (shown) may be used as void fill. The ventilation space facilitates drying as condensation forms on the underside of the metal panels.
- (6) Bearing plate
- Only thermally non-conductive clips or bars passing through the insulation assembly, or mechanically fastened bearing plates, may be used to secure and support insulation panels, or provide support for panel clips.
- (7) Architectural metal panel clip
- (8) Architectural metal roof panel (lower)
- Lower, installed prior to the pipe flashing, cut hole large enough to allow for movement. Extend 400 mm (16") upslope beyond the pipe.
- (9) Overlap area of lower panel
- Penetration flashing is mounted here, set in an acceptable sealant.
- (10) Spaced Cleat
- Cleats, set in accepted caulking, spaced 50 mm (2") and fastened with compatible non-corrosive flat head screws.
- (11) Sealant
- (12) Architectural metal roof panel (upper)
- Installed after penetration flashing. Cut hole for pipe penetration and turn lower panel end under to hook onto cleat.
- (13) Protrusion Flashing
- Flange set in two continuous beads of accepted caulking.
- (14) Sealant
- Applied around base of penetration flashing.
- (15) Settlement Cap
- Material must match flashing material.
2 RELATED WORK BY OTHERS
- (A) Acceptable Deck
NOTE: Refer to RoofStar Guarantee Standards for additional requirements.
RoofStar Guarantee Standards for ASM Roof Assemblies