
Difference between revisions of "Asphalt Shingles - Cylindrical Penetration (Flashing, Storm Collar)"
Difference between revisions of "Asphalt Shingles - Cylindrical Penetration (Flashing, Storm Collar)"
(→WORK INCLUDED) |
|||
| (3 intermediate revisions by the same user not shown) | |||
| Line 1: | Line 1: | ||
{{Template:RPM Info}} | {{Template:RPM Info}} | ||
| + | |||
| + | {{DISPLAYTITLE:<span style="position: absolute; clip: rect(1px 1px 1px 1px); clip: rect(1px, 1px, 1px, 1px);">{{FULLPAGENAME}}</span>}} | ||
| + | __NOTOC__ | ||
| + | |||
| + | <big><big>Division D - Construction Details</big></big> | ||
<hr> | <hr> | ||
| − | + | <big><big><big><big><big>Asphalt Shingles | Cylindrical Penetration (Flashing, Storm Collar) ([[Asphalt_Shingle_Systems_Standard#12.3.2.1. General Requirements for Flashing Penetrations | Article 12.3.2.1.]])</big></big></big></big></big> | |
| − | + | {{Template:Construction Details Header}} | |
| − | | | ||
| − | |||
| − | |||
<div class="panel panel-success"> | <div class="panel panel-success"> | ||
<div class="panel-heading"><big>'''Asphalt Shingle Details'''</big></div> | <div class="panel-heading"><big>'''Asphalt Shingle Details'''</big></div> | ||
| Line 17: | Line 19: | ||
<div class="col-md-6"> | <div class="col-md-6"> | ||
=== WORK INCLUDED === | === WORK INCLUDED === | ||
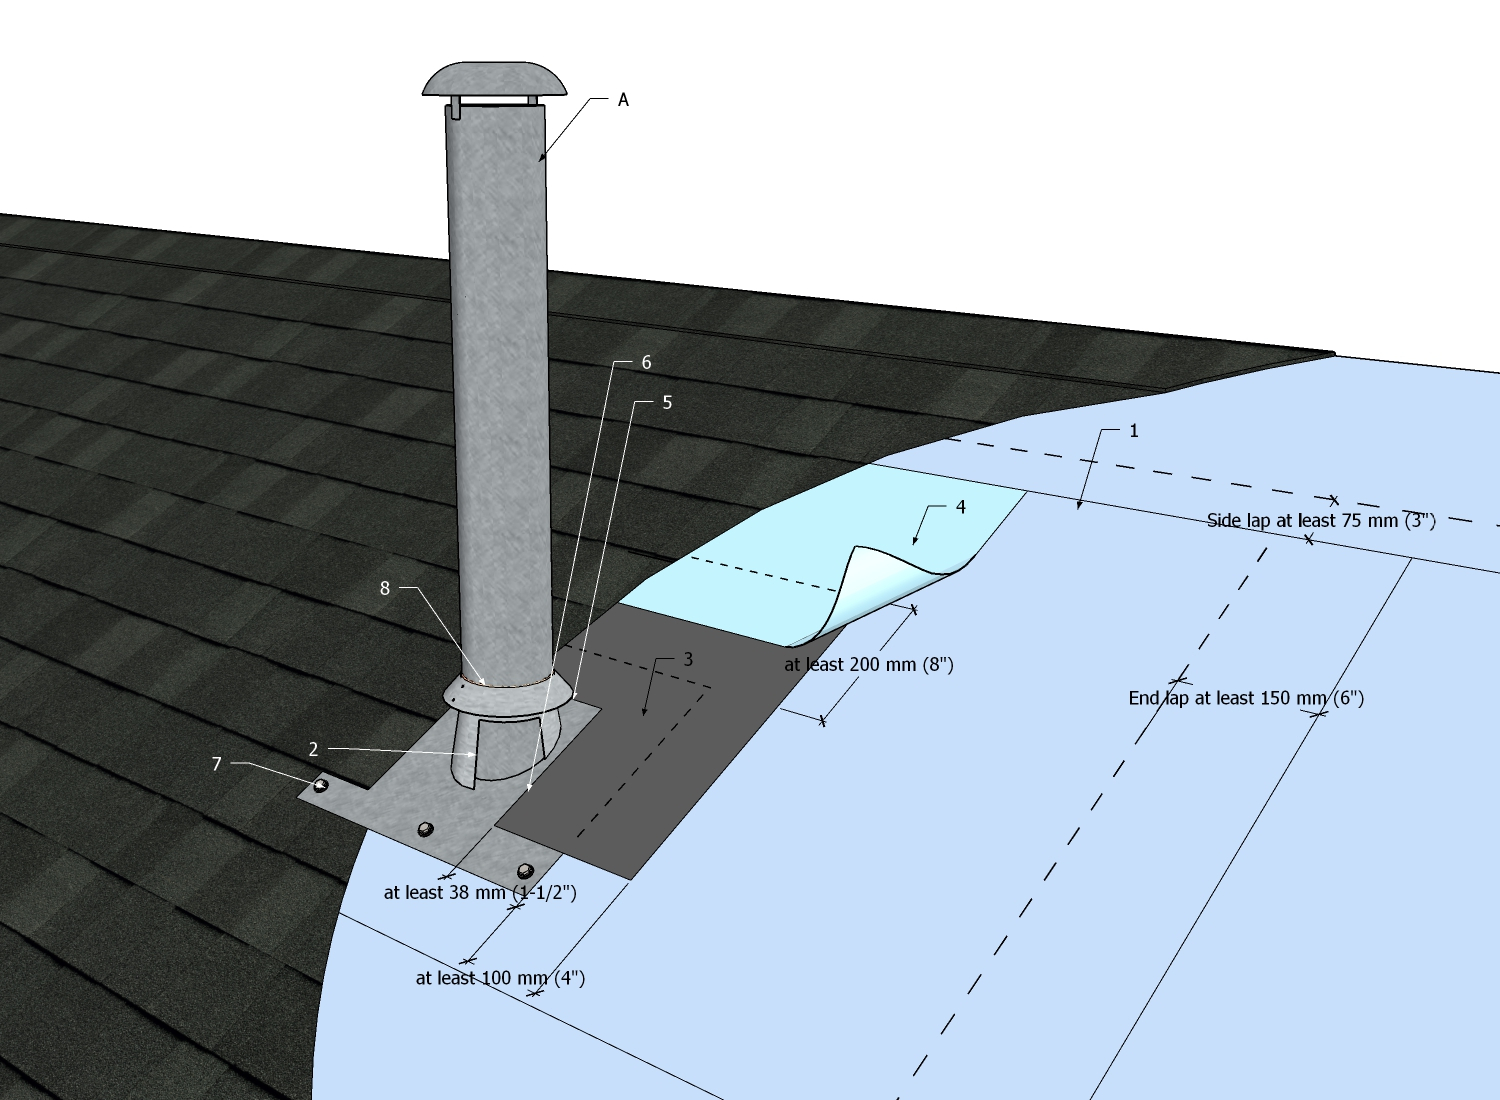
| − | ;(1) [[Asphalt Shingle Systems Standard# | + | ;(1) [[Asphalt Shingle Systems Standard#8.2.1.3. Underlayment|'''Underlayment''']]: Self-adhering or mechanically fastened, depending upon the designed slope (see '''8.1.2 Design'''). Install “shingle-style” and overlap roll ends at least 150 mm (6”); side laps must be at least 75 mm (3”). |
| − | ;(2) [[Asphalt Shingle Systems Standard# | + | ;(2) [[Asphalt Shingle Systems Standard#Section 12.2. Materials|'''Penetration flashing''']]:Conforming to material requirements in Article 8.2.1.3. Drawing shows cut-away, for illustrative purposes only. |
| − | ;(3) [[Asphalt Shingle Systems Standard# | + | ;(3) [[Asphalt Shingle Systems Standard#12.1.3.1. General Requirements for Penetrations|'''Horseshoe patch''']]: Self-adhered membrane cut to fit penetration flashing flange and extend beyond flange edges as shown in drawing and required in '''11.3.1 General'''. |
| − | ;(4) [[Asphalt Shingle Systems Standard# | + | ;(4) [[Asphalt Shingle Systems Standard#12.1.3.1. General Requirements for Penetrations|'''Underlayment patch''']]: Overlaps the horseshoe patch and fits beneath the upper course of underlayment material. |
| − | ;(5) [[Asphalt Shingle Systems Standard# | + | ;(5) [[Asphalt Shingle Systems Standard#12.1.3.1. General Requirements for Penetrations|'''Drainage path (top of penetration flashing)''']]: Minimum 12 mm (1/2”). |
| − | ;(6) [[Asphalt Shingle Systems Standard# | + | ;(6) [[Asphalt Shingle Systems Standard#12.1.3.1. General Requirements for Penetrations|'''Drainage path (side of penetration flashing)''']]: Minimum 19 mm (3/4’). |
| − | ;(7) [[Asphalt Shingle Systems Standard# | + | ;(7) [[Asphalt Shingle Systems Standard#12.1.3.1. General Requirements for Penetrations |'''Exposed fasteners''']]: Cladding fasteners with gasketed washers. See '''11.3.1 General''' and '''13.2.3 Fasteners'''. |
| − | ;(8) [[Asphalt Shingle Systems Standard# | + | ;(8) [[Asphalt Shingle Systems Standard#12.1.3.1. General Requirements for Penetrations|'''Storm collar''']]: Required for pipe-type flashings (see '''11.3.3 Penetrations and Vents'''). Caulked with an untooled bead of an acceptable sealant. |
<hr> | <hr> | ||
Latest revision as of 20:36, 2 May 2024
Division D - Construction Details
Asphalt Shingles | Cylindrical Penetration (Flashing, Storm Collar) ( Article 12.3.2.1.)
| Notice to Reader | |
| Images used in a Construction Detail are representative and not prescriptive, and are not necessarily drawn to scale. They are intended to support the related Standard (Ref. Division A, Article 2.2.1.2.).
The reader may link to the related Article in the detail title, or link to the Standard as it relates to a specific element in the detail. All hyperlinks are displayed blue text. | |
Asphalt Shingle Details
1 WORK INCLUDED
- (1) Underlayment
- Self-adhering or mechanically fastened, depending upon the designed slope (see 8.1.2 Design). Install “shingle-style” and overlap roll ends at least 150 mm (6”); side laps must be at least 75 mm (3”).
- (2) Penetration flashing
- Conforming to material requirements in Article 8.2.1.3. Drawing shows cut-away, for illustrative purposes only.
- (3) Horseshoe patch
- Self-adhered membrane cut to fit penetration flashing flange and extend beyond flange edges as shown in drawing and required in 11.3.1 General.
- (4) Underlayment patch
- Overlaps the horseshoe patch and fits beneath the upper course of underlayment material.
- (5) Drainage path (top of penetration flashing)
- Minimum 12 mm (1/2”).
- (6) Drainage path (side of penetration flashing)
- Minimum 19 mm (3/4’).
- (7) Exposed fasteners
- Cladding fasteners with gasketed washers. See 11.3.1 General and 13.2.3 Fasteners.
- (8) Storm collar
- Required for pipe-type flashings (see 11.3.3 Penetrations and Vents). Caulked with an untooled bead of an acceptable sealant.
2 RELATED WORK BY OTHERS
- (A) Penetration
- (B-vent shown)
NOTE: See the Standard for additional requirements.
Back to Asphalt Shingle System Details
© RCABC 2024
No reproduction of this material, in whole or in part, is lawful without the expressed permission of the RCABC Guarantee Corp.