Difference between revisions of "TS Details:E4.7.1 (Tile - Hips & Ridges)"
Difference between revisions of "TS Details:E4.7.1 (Tile - Hips & Ridges)"
| Line 25: | Line 25: | ||
| − | [[Section:E. Application: Steep Slope Roofs|<i class="fa fa-chevron-circle-left fa | + | [[Section:E. Application: Steep Slope Roofs|<i class="fa fa-chevron-circle-left fa" ></i> Back to ''Slate Application'']] |
| − | [[Tile and Slate Construction Details|<i class="fa fa-chevron-circle-left fa | + | [[Tile and Slate Construction Details|<i class="fa fa-chevron-circle-left fa" ></i> Back to ''Tile and Slate Construction Details'']] |
| − | [[Section:G. Construction Details|<i class="fa fa-chevron-circle-left fa | + | [[Section:G. Construction Details|<i class="fa fa-chevron-circle-left fa" ></i> Back to ''Construction Details'']] |
Revision as of 21:06, 19 August 2016
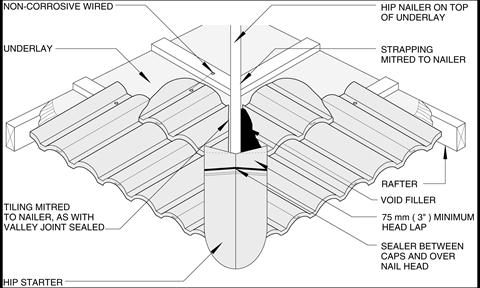
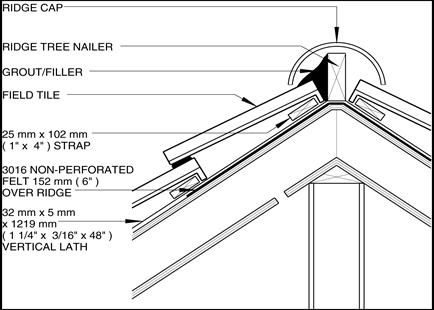
Ridge and hip tiles are applied after the field tiles are terminated against the nailer board. A sealant, mortar or plaster cement should be applied to the tops of the field tile and between laps of the ridge / hip tile. This prevents entry of wind driven rain or snow.
Tiles are started at the low end of hips or the leeward end of ridges. Each tile is nailed through the hole provided into the nailer. The lap of the next tile covers the nail. The last ridge tile nails will have to be caulked.


