
Difference between revisions of "TS Details:E4.7.5 (Tile - Curb Flashing)"
Difference between revisions of "TS Details:E4.7.5 (Tile - Curb Flashing)"
(Created page with "<hr> Curb flashings are applied around skylights, chimneys or other larger penetrations. The basic principle is to deflect the water rushing against the uproof side, safely a...") |
|||
| (7 intermediate revisions by the same user not shown) | |||
| Line 1: | Line 1: | ||
| − | + | {{Template:RPM Info}} | |
| − | |||
| − | + | {{DISPLAYTITLE:<span style="position: absolute; clip: rect(1px 1px 1px 1px); clip: rect(1px, 1px, 1px, 1px);">{{FULLPAGENAME}}</span>}} | |
| + | __NOTOC__ | ||
| − | + | <big><big>Division D - Construction Details</big></big> | |
| + | <hr> | ||
| + | <big><big><big><big><big>TS Details:E4.7.5 (Tile - Curb Flashing)</big></big></big></big></big> | ||
| + | {| class="wikitable" | style="color: black; background-color: orange; width: 100%;text-align:center" | ||
| + | | colspan="2" | <big>'''''Notice to Reader'''''</big> | ||
| + | |- | ||
| + | | style="color: black; background-color: #ffffcc; width: 100%;text-align:center" | Images used in a Construction Detail are representative and not prescriptive. Nor are they necessarily drawn to scale. Rather, they are provided to visually convey the requirements of the Standard they represent. Unless otherwise required by the Standard, dimensions, the selection of materials and their application remains the responsibility of the ''Design Authority''.<br><br>The full text of the referenced requirements in the [[Tile Systems Standard | '''Standard''']] may be read by using the <span style="color:#6495ed">'''blue hyperlinks'''</span> | ||
| + | |} | ||
| − | + | <div class="panel panel-success"> | |
| + | <div class="panel-heading"><big>'''Tile Roofing Details'''</big></div> | ||
| + | <div class="panel-body"> | ||
| + | <div class="col-md-6"> | ||
| + | <div style="text-align:center; vertical-align:center"> | ||
| + | [[File:7.3.2.2.17.jpg| link=http://rpm.rcabc.org/images/f/f7/7.3.2.2.17.jpg | class=img-responsive]] | ||
| + | </div> | ||
| + | </div><!-- COL-MD-6 --> | ||
| − | + | <div class="col-md-6"> | |
| − | + | === WORK INCLUDED === | |
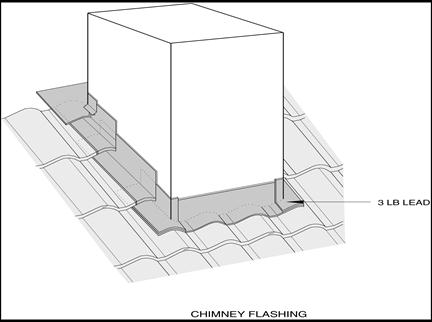
| + | ;(1) Curb flashing: Curb flashings are applied around skylights, chimneys or other larger penetrations. The basic principle is to deflect the water rushing against the uproof side, safely around then on top of the tiles on the down roof side. | ||
| + | ;(2) Upper flashing: Upper flashings should extend 150 mm (6") past corners on each side, then formed around soakers. | ||
| + | ;(3) Lower flashing: Lower flashing should extend 100 mm (4") past corners and lapped under the soakers. | ||
| + | ;(4) Mortar or mastic: A mortar or mastic bedding should be applied to the tops of the concrete tile before flashing to prevent wind blown rain or vermin from entering. | ||
| + | </div><!-- COL-6-MD --> | ||
| + | </div><!-- PANEL BODY --> | ||
| + | </div><!-- PANEL --> | ||
| − | + | '''NOTE''': See the [[Tile Systems Standard | '''Standard''']] for additional requirements. | |
<hr> | <hr> | ||
| + | [[Tile System Details|<i class="fa fa-chevron-circle-left fa" ></i> Back to ''Tile System Details'']] | ||
| + | [[Main Page | <i class="fa fa-home fa"></i> Home]] | ||
| − | + | {{Tempate:RPM Page Footer with Copyright and Current Date}} | |
| − | |||
| − | |||
| − | |||
| − | |||
Latest revision as of 21:08, 7 September 2021
Division D - Construction Details
TS Details:E4.7.5 (Tile - Curb Flashing)
| Notice to Reader | |
| Images used in a Construction Detail are representative and not prescriptive. Nor are they necessarily drawn to scale. Rather, they are provided to visually convey the requirements of the Standard they represent. Unless otherwise required by the Standard, dimensions, the selection of materials and their application remains the responsibility of the Design Authority. The full text of the referenced requirements in the Standard may be read by using the blue hyperlinks | |
Tile Roofing Details
1 WORK INCLUDED
- (1) Curb flashing
- Curb flashings are applied around skylights, chimneys or other larger penetrations. The basic principle is to deflect the water rushing against the uproof side, safely around then on top of the tiles on the down roof side.
- (2) Upper flashing
- Upper flashings should extend 150 mm (6") past corners on each side, then formed around soakers.
- (3) Lower flashing
- Lower flashing should extend 100 mm (4") past corners and lapped under the soakers.
- (4) Mortar or mastic
- A mortar or mastic bedding should be applied to the tops of the concrete tile before flashing to prevent wind blown rain or vermin from entering.
NOTE: See the Standard for additional requirements.
© RCABC 2024
No reproduction of this material, in whole or in part, is lawful without the expressed permission of the RCABC Guarantee Corp.