Difference between revisions of "Asphalt Shingles - Diverter Flashing"
Difference between revisions of "Asphalt Shingles - Diverter Flashing"
| Line 8: | Line 8: | ||
<div style="text-align:center; vertical-align:center"> | <div style="text-align:center; vertical-align:center"> | ||
| − | [[File:ASh 10.1.2-1 CD.jpg|class=img-responsive]] | + | {| class="wikitable"; table style="background-color:white"; border="#A9A9A9;" |
| + | |+ Click on any image to expand it | ||
| + | |- | ||
| + | | [[File:ASh 10.1.2-1 CD.jpg|class=img-responsive | link=http://rpm.rcabc.org/images/a/a9/ASh_10.1.2-1_CD.jpg]] || [[File:ASh 10.1.2-2 CD.jpg|class=img-responsive | link=http://rpm.rcabc.org/images/9/90/ASh_10.1.2-2_CD.jpg]] | ||
| + | |- | ||
| + | | [[File:ASh 10.1.2-3 CD.jpg|class=img-responsive | link=http://rpm.rcabc.org/images/2/25/ASh_10.1.2-3_CD.jpg]] || [[File:ASh 10.1.2-4 CD.jpg|class=img-responsive | link=http://rpm.rcabc.org/images/3/3b/ASh_10.1.2-4_CD.jpg]] | ||
| + | |} | ||
| + | |||
</div> | </div> | ||
</div><!-- COL-MD-6 --> | </div><!-- COL-MD-6 --> | ||
| Line 14: | Line 21: | ||
<div class="col-md-6"> | <div class="col-md-6"> | ||
=== WORK INCLUDED === | === WORK INCLUDED === | ||
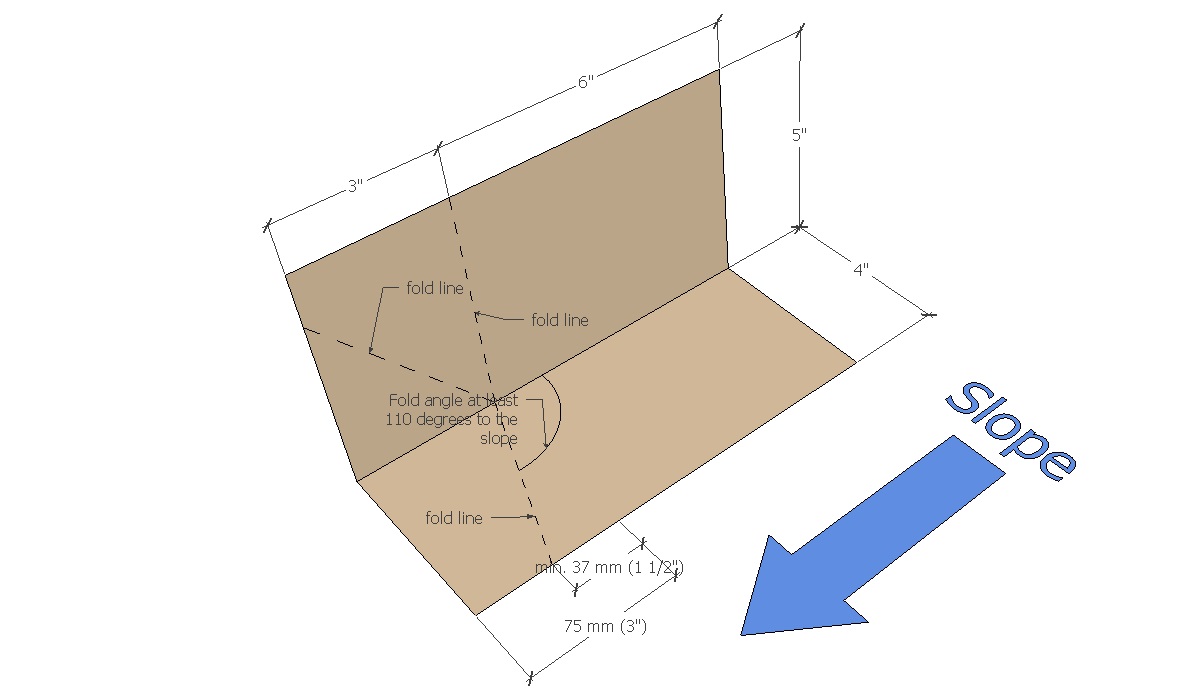
| − | ;(1) [[RoofStar Guarantee Standards for Asphalt | + | ;(1) [[RoofStar Guarantee Standards for Asphalt Shingle Systems#AShDIVERTER|'''Step 1''']]: Use a standard 225 mm (9”) long step flashing and scribe the fold lines as shown on the illustration. Note that the down-slope upstand is bent at a 110-degree angle to the slope. No cutting is needed or appropriate; the flashing is formed with folds, bread-pan style. |
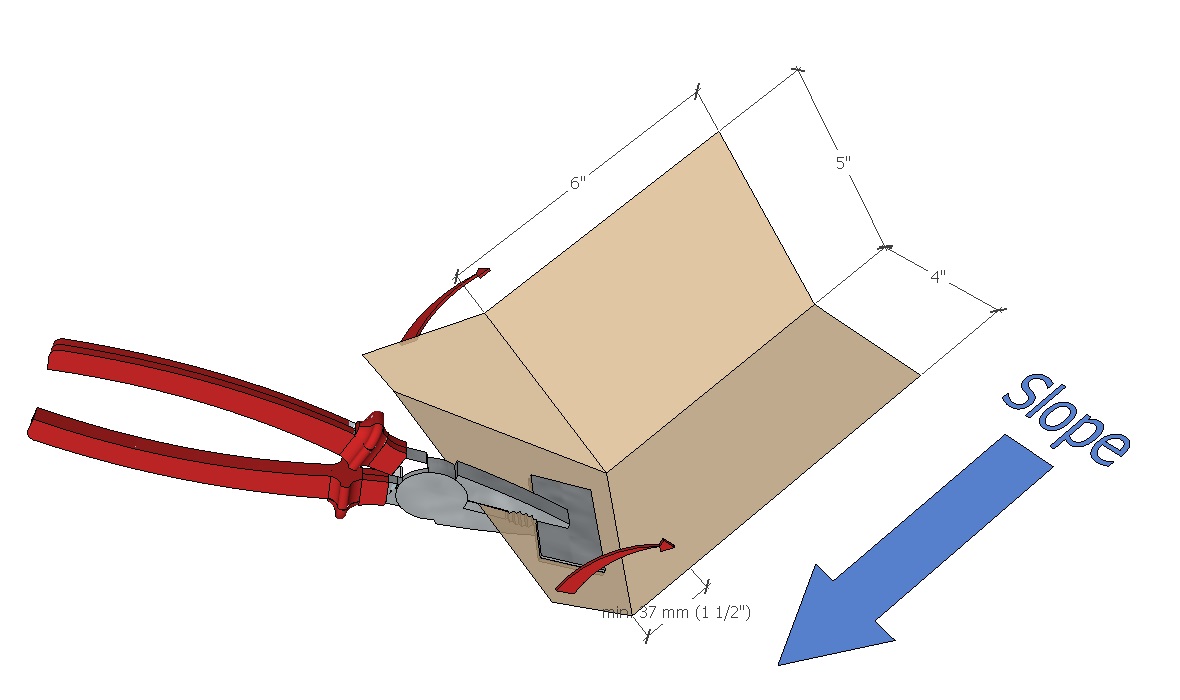
| − | ;(2) | + | ;(2) [[RoofStar Guarantee Standards for Asphalt Shingle Systems#AShDIVERTER|'''Step 2''']]: Fold the bottom end of the flashing as illustrated, so that the bottom upstand aligns with the vertical bread-pan fold made in the next step. |
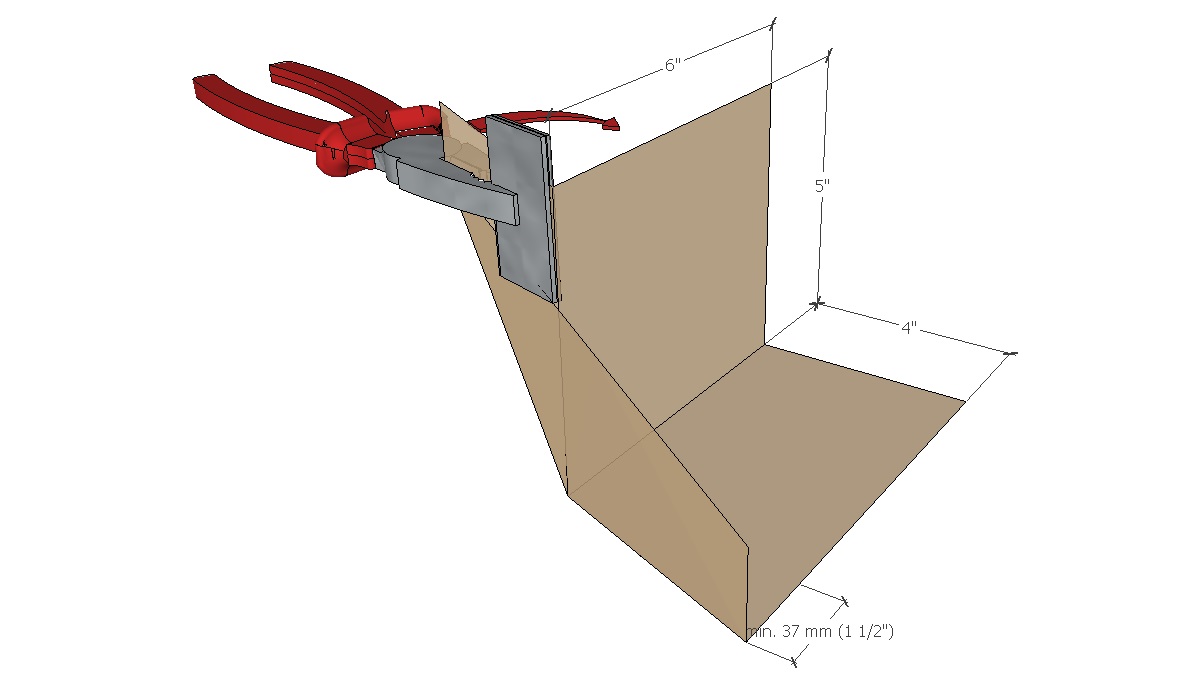
| − | ;(3) [[RoofStar Guarantee Standards for Asphalt | + | ;(3) [[RoofStar Guarantee Standards for Asphalt Shingle Systems#AShDIVERTER|'''Step 3''']]: Fold the back flap around and behind the main upstand, bread-pan style. |
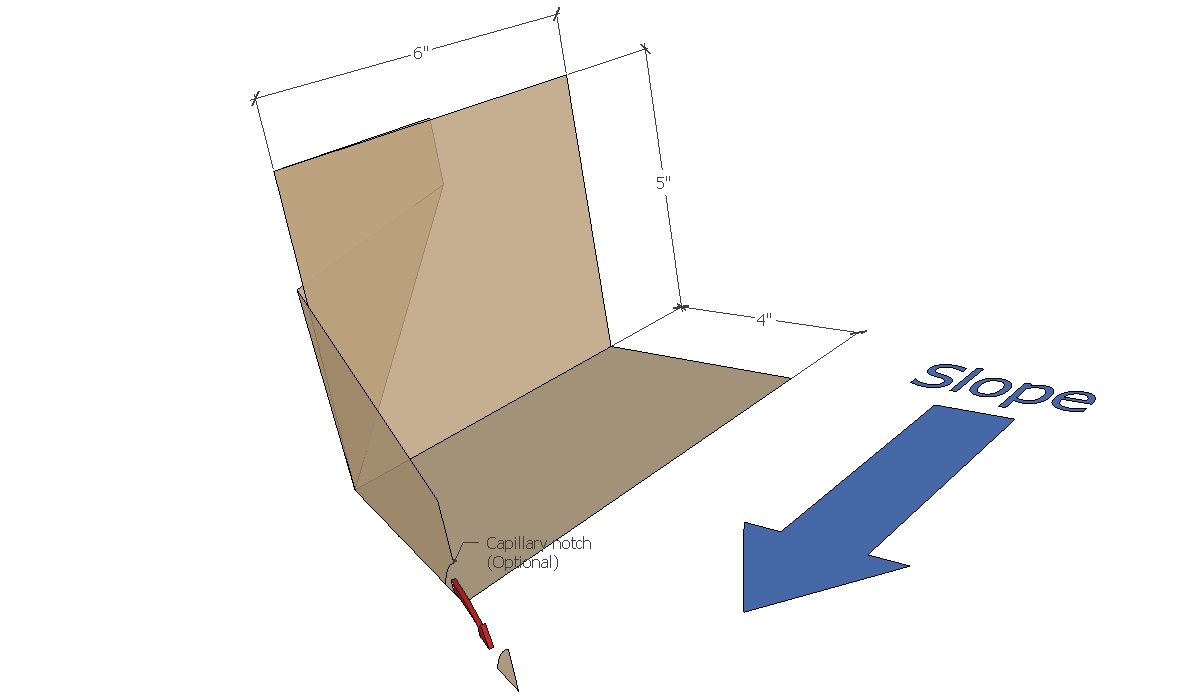
| − | ;(4 | + | ;(4) [[RoofStar Guarantee Standards for Asphalt Shingle Systems#AShDIVERTER|'''Step 4''']]: If required or desirable, cut a capillary notch in the bottom upstand (illustrated), and trim the upstand to suit the aesthetics of the roof. |
| − | |||
| − | |||
| − | |||
<hr> | <hr> | ||
=== RELATED WORK BY OTHERS === | === RELATED WORK BY OTHERS === | ||
| − | ; | + | ;None |
</div><!-- COL-6-MD --> | </div><!-- COL-6-MD --> | ||
</div><!-- PANEL BODY --> | </div><!-- PANEL BODY --> | ||
Revision as of 15:24, 18 October 2019
| RoofStar Guarantee Standards are blue-linked |
Asphalt Shingle Details
1 WORK INCLUDED
- (1) Step 1
- Use a standard 225 mm (9”) long step flashing and scribe the fold lines as shown on the illustration. Note that the down-slope upstand is bent at a 110-degree angle to the slope. No cutting is needed or appropriate; the flashing is formed with folds, bread-pan style.
- (2) Step 2
- Fold the bottom end of the flashing as illustrated, so that the bottom upstand aligns with the vertical bread-pan fold made in the next step.
- (3) Step 3
- Fold the back flap around and behind the main upstand, bread-pan style.
- (4) Step 4
- If required or desirable, cut a capillary notch in the bottom upstand (illustrated), and trim the upstand to suit the aesthetics of the roof.
2 RELATED WORK BY OTHERS
- None
NOTE: Refer to RoofStar Guarantee Standards for additional requirements.
RoofStar Guarantee Standards for Asphalt Shingle Systems


