Difference between revisions of "SBS Window Opening"
Difference between revisions of "SBS Window Opening"
| (2 intermediate revisions by the same user not shown) | |||
| Line 6: | Line 6: | ||
<big><big>Division D - Construction Details</big></big> | <big><big>Division D - Construction Details</big></big> | ||
<hr> | <hr> | ||
| − | <big><big><big><big><big>SBS 10.3.4. | + | <big><big><big><big><big>SBS | Window Opening ([[SBS_Roof_Systems_Standard#10.3.4.5._Doors.2C_Windows.2C_and_Wall_Openings | Article 10.3.4.5.]])</big></big></big></big></big> |
| − | { | + | {{Template:Construction Details Header}} |
| − | |||
| − | |||
| − | |||
| − | |||
<div class="panel panel-success"> | <div class="panel panel-success"> | ||
<div class="panel-heading"><big>'''SBS Details'''</big></div> | <div class="panel-heading"><big>'''SBS Details'''</big></div> | ||
Latest revision as of 18:51, 27 June 2022
Division D - Construction Details
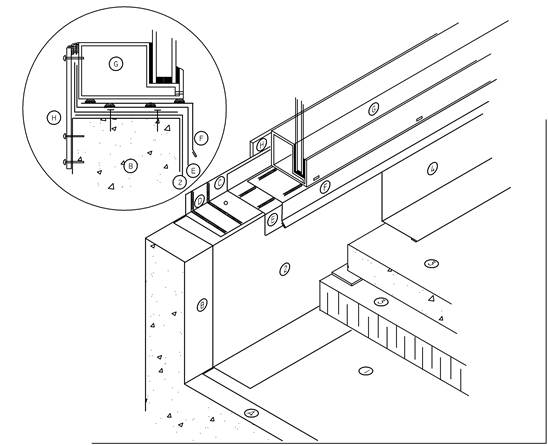
SBS | Window Opening ( Article 10.3.4.5.)
| Notice to Reader | |
| Images used in a Construction Detail are representative and not prescriptive, and are not necessarily drawn to scale. They are intended to support the related Standard (Ref. Division A, Article 2.2.1.2.).
The reader may link to the related Article in the detail title, or link to the Standard as it relates to a specific element in the detail. All hyperlinks are displayed blue text. | |
SBS Details
1 WORK INCLUDED
- (1) Primary Roof Membrane
- Installed per RoofStar Guarantee Standards.
- (2) Membrane Flashing
- Carried up walls a minimum 200 mm (8") above roof surface. At window curbs membrane flashing must be 200mm (8") in height above the top of extruded polystyrene insulation or protection/drainage layer, extended under the window mullion (fenestration assembly) and carried to the inside edge of the curb. Membrane gussets must be installed at all corners and transitions.
- (3) Protection/Drainage Layer - Insulation Surfacing
- Assemblies to be determined by Design Authority. Paver systems are required to have proprietary pedestals that incorporate a minimum 3mm (1/8") gap between adjacent units. See additional requirements under 12.1 Protected and Modified Protected Membrane Roof Assemblies.
- (4) Metal Wall Flashing
- Required on roof assemblies using gravel ballast, filter mats and drainage mediums at insulation /curb interfaces.
2 WORK BY OTHERS
- (A) Acceptable Supporting Deck Structure
- Concrete slab shown
- (B) Supporting Curb
- Height varies depending on the insulation thickness and type of roof assembly.
- (C) Metal Water Stop Flashing
- Mechanically attached to the top of the window curb. Cut flashing to fit the opening and pan fold, weld, or solder seams at all corners and mitres.
- (D) Metal Water Stop Flashing Seam
- Overlap metal water stop joints a minimum of 150mm (6") and seal joints with two rows of structural sealant.
- (E) Building Envelope Membrane Flashing
- Must be compatible with and overlap the roof membrane flashing. Membrane gussets must be installed at all corners and transitions.
- (F) Metal Cap Flashing
- Adhere metal cap flashing to membrane flashing with a membrane compatible structural sealant. Mechanical attachment of metal flashing through the membrane flashing is not acceptable.
- (G) Fenestration Assembly
- CAUTION - Securement fasteners MUST NOT penetrate the metal or membrane flashing.
- (H) Fenestration Assembly Securement Bar
- Fasten securement bar ONLY through upper vertical leg of the window mullion (frame).
NOTE: See the Standard for additional requirements.
Back to "SBS" Roof System Details
© RCABC 2024
RoofStarTM is a registered Trademark of the RCABC.
No reproduction of this material, in whole or in part, is lawful without the expressed permission of the RCABC Guarantee Corp.

