Difference between revisions of "TS Details:E4.7.5 (Tile - Curb Flashing)"
Difference between revisions of "TS Details:E4.7.5 (Tile - Curb Flashing)"
| Line 3: | Line 3: | ||
The recommended method is to use 3 lb. lead sheeting due to its malleability and, therefore, easy conformance to the tile’s contour. | The recommended method is to use 3 lb. lead sheeting due to its malleability and, therefore, easy conformance to the tile’s contour. | ||
| + | {| class="wikitable" | style="color: black; background-color: orange; width: 100%;text-align:center" | ||
| + | | colspan="2" | <big>'''''RoofStar Guarantee Standards''''' are <span style="color:#6495ed">'''blue-linked'''</span></big> | ||
| + | |} | ||
<div class="panel panel-success"> | <div class="panel panel-success"> | ||
<div class="panel-heading"><big>'''Tile Roofing Details'''</big></div> | <div class="panel-heading"><big>'''Tile Roofing Details'''</big></div> | ||
Revision as of 15:17, 1 September 2016
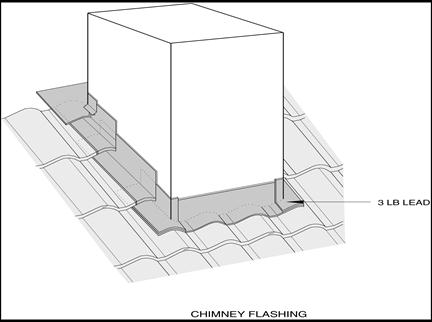
Curb flashings are applied around skylights, chimneys or other larger penetrations. The basic principle is to deflect the water rushing against the uproof side, safely around then on top of the tiles on the down roof side.
The recommended method is to use 3 lb. lead sheeting due to its malleability and, therefore, easy conformance to the tile’s contour.
| RoofStar Guarantee Standards are blue-linked |
Tile Roofing Details
Upper and lower flashings should be conformed with tile’s surface.
- Upper flashings should extend 150 mm (6") past corners on each side, then formed around soakers.
- Lower flashing should extend 100 mm (4") past corners and lapped under the soakers.
A mortar or mastic bedding should be applied to the tops of the concrete tile before flashing to prevent wind blown rain or vermin from entering.

