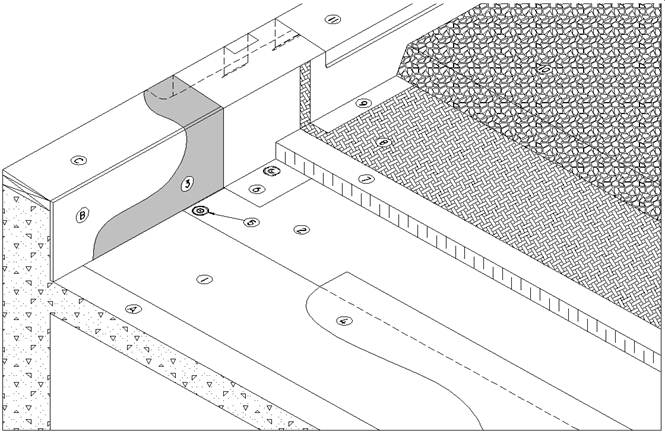
EPDM Protected Roof Assembly (Typical)
EPDM Protected Roof Assembly (Typical)
Revision as of 15:51, 21 September 2016 by James Klassen (talk | contribs)
| RoofStar Guarantee Standards are blue-linked |
EPDM Details
1 WORK INCLUDED
- (1) Protection Mat
- Provide protection between concrete deck and membrane with installation of manufacturer specified and RGC accepted protection mat or deck overlay boards.
- (2) Single-ply Membrane
- Installed according to manufacturer's instructions and RoofStar Guarantee Standards.
- (3) Adhesive
- Proprietary, installed according to manufacturer's instructions, usually brushed, rolled or sprayed.
- (4) Membrane Lap
- EPDM (thermoset) membrane may be joined using uncured tape or proprietary adhesive.
- (5) Fasteners
- Install according to manufacturer's instructions (style may vary depending on material type and manufacturer's specification). May vary from drawing.
- (6) Membrane Flashing
- Adhered according to manufacturer's printed specifications using proprietary adhesive. Must be carried to outside of parapet or minimum 200 mm (8") above finished roof surface. Adhered to primary membrane.
- (7) Insulation
- Mechanically attached. Installed according to RoofStar Guarantee Standards. See available insulation products in the Accepted Materials section of this Manual.
- (8) Filter Fabric
- Metal base flashing required.
- (9) Metal Flashing
- As required by RoofStar Guarantee Standards.
- (10) Ballast
- Gravel or concrete paving tiles.
(11) Parapet Flashing: As required by RoofStar Guarantee Standards.
2 RELATED WORK BY OTHERS
- (A) Acceptable Deck
- (B) Acceptable Parapet Surface
- Surface must be smooth, dry and clean. Rough surface must be covered with treated plywood, to be determined by design authority or inspector or as required by manufacturer.
- (C) Sloped Wood Blocking
NOTE: Refer to RoofStar Guarantee Standards for additional requirements.

