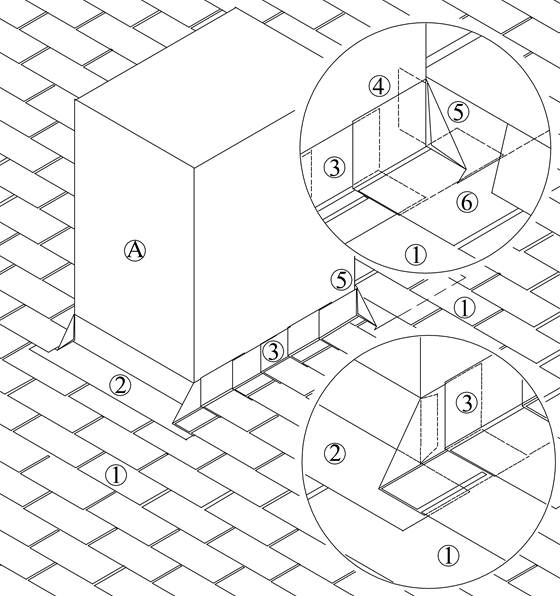
Asphalt Shingles - Curb Flashing (Typical)
Asphalt Shingles - Curb Flashing (Typical)
Revision as of 22:09, 31 August 2021 by James Klassen (talk | contribs)
| Notice to Reader | |
| Images used in a Construction Detail are representative and not prescriptive. Nor are they necessarily drawn to scale. Rather, they are provided to visually convey the requirements of the Standard they represent. Unless otherwise required by the Standard, dimensions, the selection of materials and their application remains the responsibility of the Design Authority. The full text of the referenced requirements in the Standard may be read by using the blue hyperlinks | |
Asphalt Shingle Details
1 WORK INCLUDED
- (1) Asphalt Shingles
- Installed to manufacturer’s published instructions and RoofStar Guarantee Standards.
- (2) Apron Flashing
- Extended a minimum 100mm (4") beyond corners, interwoven with shingles and step flashings.
- (3) Step Flashing
- Interwoven with each course of shingles, 75mm (3") head lap.
- (4) Final Step flashing
- Extended around corner of the upstand and under back pan flashing. The upstand fold can alternatively be turned outward under the back pan fold.
- (5) Backpan Flashing
- The back-pan is to be extended 100mm (4") beyond the corner and folded. Apply caulking at the transition corner of the final step flashing and back pan.
- (6) Capillary Section
- A capillary tab is to be extended off the end of the back pan to lead water around the corner.
- Proprietary soldered or welded diverter flashing may be used provided they conform to RoofStar Guarantee Standards.
NOTE: See the Standard for additional requirements.
Back to Asphalt Shingle System Details
© RCABC 2026
RoofStarTM is a registered Trademark of the RCABC.
No reproduction of this material, in whole or in part, is lawful without the expressed permission of the RCABC Guarantee Corp.

