Siplast SBS Membrane Installation Guidelines
Siplast SBS Membrane Installation Guidelines
| Notice to the Reader:
The instructions provided below are reprinted from the manufacturer's own materials which were submitted to the RoofStar Guarantee Program for inclusion in this Manual. The reader is urged to check these against current publications issued by the manufacturer, to ensure accuracy. |
Manufacturer: SIPLAST / ICOPAL
Contact Address: See Membership List in Section 1.
Product Group: SBS MODIFIED BITUMINOUS MEMBRANES
Country of Origin: France
Country of Manufacture: France, USA, Germany, England, Poland, Denmark
Years First Installed:
- B.C.: 1978
- Canada: 1978
- Foreign: 1967
1 Description
Siplast developed prefabricated sheet membranes in 1955 and introduced SBS Modified Bitumens in 1967, producing an elastomeric blend with exceptional elongation recovery characteristics. Reinforcing mats (consisting of polyester, fibreglass, or a combination thereof) are saturated and coated with varied thicknesses of elastomeric bitumen to produce roof membranes with specific physical properties.
Presently, Siplast manufacturers a wide variety of membranes, each designed to satisfy the demands of particular roof conditions. The “Paradiene”, “Parafor”, “Veral” and “Teranap” series are Siplast’s major membrane systems, with a number of speciality membranes designed to extend their range of applications. These membranes are available with ceramic granules, slate flakes, metal foil, polypropylene film, or sanded finishes and may be designed to be installed with hot asphalt, heat welding, adhesive or peel and stick self-adhesive in every type of roofing system.
1.1 GENERAL
- The roofing assembly / material information published by the RoofStar Roofing Practices Manual does NOT represent a complete set of the manufacturer's published data, nor does it represent a detailed specification. The preparation of a detailed specification is the responsibility of the design authority.
SYSTEM DESCRIPTION
- Two-ply roof membranes: the first ply consists of a base sheet; applied with hot asphalt, cold adhesive, fully heat welded, heat activated, spot adhered with adhesives and heat welded seams, self-adhered with self-stick products or loose laid with heat welded seams; the second ply consists of a cap sheet applied with hot asphalt, cold adhesive or heat welding.
- Single-ply roof membrane: install suitable membrane either loose-laid with seams heat welded in a ballasted system, spot adhered with adhesive, mechanically fastened and with heat welded seams, or fully heat welded to an approved substrate. Provided all of the seams are properly sealed, a single-ply system will function as well as a two-ply system. Since the workmanship factor can be variable, a two-ply system offers a safety factor when slopes are minimal.
COMPOSITION
- Binder: When a bitumen is modified by the addition of polymers, microscopic polymeric networks are created within the bitumen which markedly changes the characteristics of the materials. Only if the polymer has been thoroughly mixed with the bitumen and the elastomeric segments remain well dispersed at ambient temperatures, will the structure be continuous and rubbery and form entirely within the bitumen. In other words, these advantageous properties may be obtained only with a suitable degree of compatibility between bitumen and thermoplastic resin and by preparing the mixture with a certain type of bitumen.
- The binder in the roofing sheet is the critical component. It provides:
- the waterproofing system
- the elasticity
- the aging characteristics
- the flexibility at low temperatures
- Reinforcement: The characteristics of a quality binder can be enhanced by the proper choice of reinforcements. Reinforcement must counteract rupture in traction or compression, the limit of elasticity in traction or compression (undefined repeatable movements), or the limit of fatigue. To a lesser extent, reinforcements offer resistance to static puncture, stress induced by temperature variation, and wind effects. With few exceptions, however, it reduces the cold bending properties, the elasticity, and the elongation to rupture.
- While many types of reinforcements can be used, the most common are glass fibre, polyester and composite glass / polyester. Glass fibre reinforcement offers high tensile strength and excellent dimensional stability while polyester offers greater puncture resistance. The same type and weight of mat will give superior puncture resistance and tensile strength if saturated with elastomeric bitumen rather than an oxidized bitumen.
- Aging: Proper aging is contingent on the rate of modification, the compatibility of the bitumen with the polymer, and the blending being done correctly, with correctly blending the bitumen and SBS being the most important. Thick sheets display a much slower rate of aging than the thin sheets. Reinforcement does little to extend the aging process.
- Thickness: For heat welded application, where heat partially melts the binder, the reinforcement ensures the rigidity and the thickness ensures thermal inertia. Heat welded sheets should be no less than 3.0 mm (0.12"), measured without granules. Single ply membranes with heavy polyester / glass scrim reinforcement should have a minimum thickness of 4.0 mm (0.16"), measured without granules.
- Membranes applied with a mopping of hot bitumen or cold adhesive should have a minimum thickness of 2.3 mm. Extreme care should be taken when asphalt mopping membranes thicker than 2.3 mm since the heat capacity of the thicker membranes can drop the temperature of the mopping asphalt below required minimums before a satisfactory bond is achieved.
- Glaze Coat of Asphalt: Elastomeric membranes designed for torch welding should have additional mass for this purpose. Glazing the overlay and re-melting the glaze coat is a method designed to introduce additional mass to a system designed for asphalt application.
- Pour Coat and Gravel Surfacing: Pour coat and gravel surfacing can replace mineral granule cap sheets on roof systems with minimal slopes. This practice, however, can mask deficiencies and eliminates the possibility of refurbishing the system at a later date.
- Vapour Retarders: The function of a vapour retarder is a design consideration as it relates to climate and occupancy of the building.
- Cant Strips: Cants are not necessarily required where it is certain that no differential movement will occur at the joint; or in heat welded systems. However, they are considered standard practice in asphalt or adhesive applied assemblies. Whenever cant strips are used, do not adhere the membrane base sheet to them.
DELIVERY, STORAGE, AND HANDLING
- Deliver and store materials in original packages and containers with manufacturer's seals and labels intact.
- Store rolls on end; selvage end up; do not store in a leaning position.
- Elevate from contact with ground and moisture.
- Handle in such a manner to ensure membranes remain dry prior to and during installation.
SITE CONDITIONS
- Slope: when asphalt is used, slopes over 1:20 (5/8"in 12") require mechanical fixing of the top lap in the base sheet, using large-head galvanized roofing nails spaced at 150 mm (6") o/c staggered, and a fully torched cap sheet. Do not use asphalt on slopes over 1:12 (1" in 12").
- With torch applications, slopes over 1:3 (4" in 12") require mechanical fixing of the top lap. Run all plies parallel to the slope of the roof.
- Slopes over 1:3 (4" in 12") require nailers be incorporated into insulated systems.
- In all cases, contact the membrane manufacturer for slopes over 1:20 (5/8" in 12").
- Minimum ambient application temperature:
- hot asphalt-applied - +5°C (+41°F) including wind chill
- torch-applied - determined by worker's tolerance
- adhesive-applied - contact membrane manufacturer
- Chemical incompatibility: SBS modified bitumen products are not compatible with coal tar pitch, and not resistant to oil and petroleum products. Contact Siplast / Icopal for specific requirements.
- Roof deck overlay: acceptable roof deck overlays include fibreboard, plywood, Dens Deck, asphalt recovery board or a minimum No. 40 glass-ply felt (CSA A123.2-M, Type CF).
- Insulations: modified bitumens can be used with most common insulations used for roofing and installed according to RoofStar Guarantee Standards.
- Minimum asphalt temperature: +205°C (+400°F) at the point of application.
- Adhesive application: the use of adhesive is intended to adhere the body of the membrane to the substrate, or to adhere membranes to themselves.
- Adhesives must never be used with membranes incorporating a metal foil.
- Base stripping plies can be heat welded, peel and stick or applied with cold adhesive.
- PA-828 adhesive is employed for fixing the membrane on vertical surfaces.
- In all cases, contact the membrane manufacturer.
STANDARDS AND APPROVALS (for specific membranes or assemblies consult manufacturer)
- Canadian General Standards Board: 37-GP-56M (Grade, Type, and Class vary with membrane)
- Underwriters Laboratories: Class A, B, C.
- Underwriters Laboratories of Canada: Referenced to cULus
- Factory Mutual: Class 1 Fire and I-90 Windstorm or greater.
- Other: Avis Technique, Agreement, DIN, ASTM.
MANUFACTURER'S SERVICES
- Applicator training: Siplast membranes are applied by APPROVED APPLICATORS ONLY.
- Technical service: technical representatives are available for consultation and field training; owners, architects, and engineers are assisted in the selection and proper use of Siplast materials by technical representatives.
- Specification / Drawings: complete specifications and detail drawings are available upon request.
EQUIPMENT
- Torches: only torches with a trigger handle designed for the purpose of torching roofing material are acceptable.
1.2 MATERIALS
| NOTE: Regardless of the materials listed below or anywhere else in these manufacturer's guidelines, only materials accepted for use in the RoofStar Guarantee Program, or accessories associated with those materials, may be used to qualify for a RoofStar Guarantee. To see a list of the manufacturer's products accepted for use in the RoofStar Guarantee Program, click on the link above. |
MEMBRANES
Consult the list of Accepted Materials by clicking on the MATERIALS link above.
1.3 EXECUTION
PREPARATION
- Apply roofing materials over clean, dry surfaces in accordance with good roofing practices of the RoofStar Guarantee Program.
- Ensure moisture, in any form, is completely removed from the substrate prior to membrane application.
- Prime all metal flashings to be installed in the membrane and allow primer to dry prior to installation.
APPLICATION INSTRUCTIONS FOR A SINGLE-PLY
- Apply one ply of base sheet for 510 mm (20") around perimeter and around any protrusions in accordance with the appropriate detail. Do not adhere base sheet to cant strip.
- Beginning at the low point of the roof, apply the membrane to the substrate using a minimum side lap of 90 mm (3-1/2") and an end lap of 300 mm (12"). Stagger end joints. Adhere the cap sheet to the base sheet around the perimeter and protrusions by heat welding or adhesive. Seal all joints with a torch. Terminate the cap sheet at the top of the cant strip.
- The roll can be installed parallel to the slope on roofs with a slope greater than 1:24 (1/2" in 12").
- Provide a smooth application, free of air pockets, wrinkles, fishmouths or tears.
APPLICATION INSTRUCTIONS FOR A TWO-PLY
- Beginning at the low point of the roof, apply the membrane base sheet to the substrate using a minimum side lap of 65 mm (2-1/2") and an end lap of 150 mm (6"). Stagger end joints. Terminate the base sheet at the top of the cant strip. Do not adhere base sheet to cant strip.
- Beginning again at the low point of the roof, fully adhere the membrane cap sheet to the base sheet. Lap side joints 65 mm (2-1/2") and end joints 150 mm (6"). Stagger end joints between plies of membrane so that at no location will the distance between joints of the bottom ply and the top ply be less than 300 mm (12").
- Provide a smooth application, free of air pockets, wrinkles, fishmouths or tears.
2 Membrane Assemblies
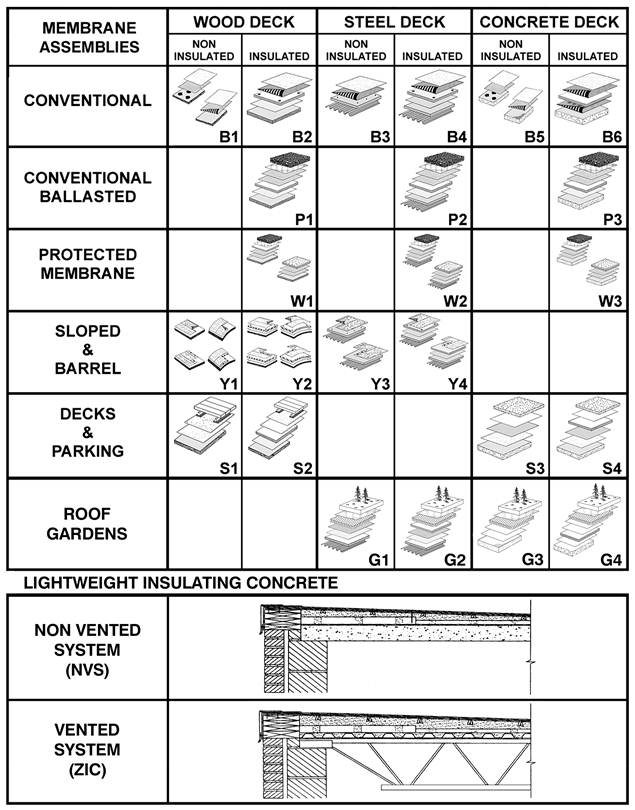
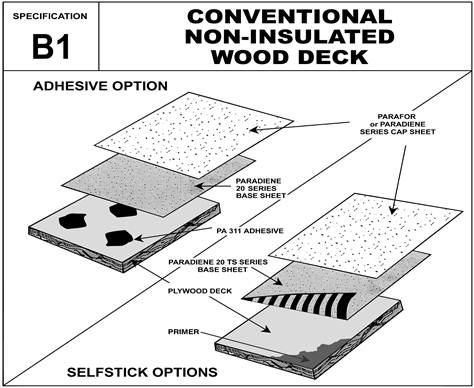
2.1 Exposed Membrane - Un-insulated Wood Deck
PARADIENE 20 SERIES BASE SHEETS (adhesive)
- Install PA311 Adhesive in a 500mm band around perimeter and all protrusions. Install base sheet in PA311 Adhesive, applied at a rate of 5 – 200 mm diameter blobs per square meter coinciding with sides and center of base sheet. Install PA311 in sufficient height to make full contact with base sheet. Lap side joints 76 mm and end joints 150 mm. Stagger end joints a minimum of 300 mm. Seal all joints by heat welding.
PARADIENE 20TS BASE SHEET (heat activated)
- Prime the plywood deck. Heat the back of the sheet to fully defeat the protective film and warm the adhesive stripes. Install the sheet by rolling out onto the deck, adhered at the striped locations. Lap side joints 76 mm and end joints 150 mm. Stagger end joints a minimum of 300 mm. Seal all end joints by heat welding.
PARADIENE 20TS SA (self-stick)
- Prime the plywood deck. Install the base sheet by removing the protective paper on the underside and allowing the sheet to self adhere to the deck surface. Lap side joints 76 mm and end joints 150 mm. Stagger end joints a minimum of 300 mm. Remove the protective strip on side joints and allow the joints to adhere. Seal end joints by heat welding or cover strip and surface torch and roll all side joints.
- Install base stripping as required. Consult the Construction Details section of this Manual.
HEAT WELDED CAP SHEET
- Install cap sheet, fully heat welded to base sheet. Lap side joints 76 mm and end joints 150 mm. Stagger end joints and joints between plies of membrane a minimum of 300 mm
ADHESIVE APPLIED CAP SHEET
- Install the cap sheet by fully embedding in adhesive. Lap side joints 76 mm and end joints 150 mm. Stagger end joints and joints between plies of membrane a minimum of 300 mm.
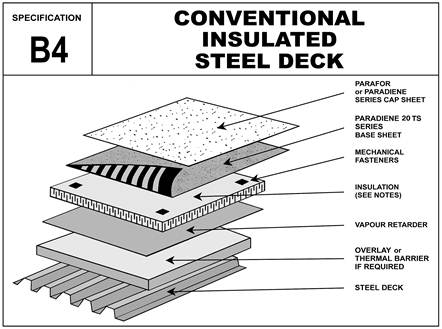
2.2 Exposed Membrane - Insulated Wood Deck
- If required, install the overlay, mechanically fastened, to the steel deck. Stagger end joints a minimum of 300 mm.
- If required, install vapour retarder dry. Lap side joints 75 mm and end joints 150 mm. Stagger end joints a minimum of 300 mm. Seal joints.
- Install insulation dry. Take care to ensure that no voids are created between insulation and substrate and between pieces of insulation. Stagger end joints of insulation a minimum of 300 mm. Mechanically fasten insulation to the deck with screws and 75 mm plates in accordance with current recommendations and regulations.
PARADIENE 20TS BASE SHEET (heat-activated) –
- Heat the back of the sheet to fully defeat the protective film and warm the adhesive stripes. Install the sheet by rolling out onto the insulation, adhered at the striped locations. Lap side joints 76 mm and end joints 150 mm. Stagger end joints a minimum of 300 mm. Seal all end joints by heat welding.
PARADIENE 20TS SA (self-stick) –
- Install the base sheet by removing the protective paper on the underside and allowing the sheet to self adhere to the insulation surface. Lap side joints 76 mm and end joints 150 mm. Stagger end joints a minimum of 300 mm. Remove the protective strip on side joints and allow the joints to adhere. Seal end joints by heat welding or cover strip and surface torch and roll all side joints.
PARADIENE 20 SERIES BASE SHEETS (ADHESIVE OR ASPHALT)
- (Insulation overlay is required) Install the base sheet by fully embedding in hot asphalt or adhesive. Lap side joints 76 mm and end joints 150 mm. Stagger end joints a minimum of 300 mm.
- Install base stripping as required. Consult Details section.
HEAT WELDED CAP SHEET –
- Install cap sheet, fully heat welded to base sheet. Lap side joints 76 mm and end joints 150 mm. Stagger end joints and joints between plies of membrane a minimum of 300 mm.
ADHESIVE APPLIED CAP SHEET –
- Install the cap sheet by fully embedding in adhesive. Lap side joints 76 mm and end joints 150 mm. Stagger end joints and joints between plies of membrane a minimum of 300 mm.
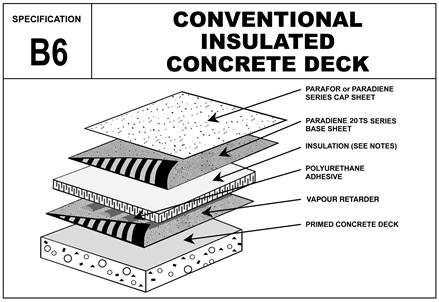
2.3 Exposed Membrane - Insulated Concrete Deck
- If vapour retarder is required, prime the concrete deck. Install the Paradiene 20TS S vapour retarder by heating the back of the sheet to fully defeat the protective film and warm the adhesive stripes. Install the sheet by rolling out onto the deck, adhered at the striped locations. Lap side joints 76 mm and end joints 150 mm. Stagger end joints a minimum of 300mm. Seal all end joints by heat welding.
- Apply insulation adhesive to the concrete or Paradiene 20TS S surface according to current printed instructions issued by the manufacturer of the adhesive. Place the insulation boards onto the adhesive beads and follow the manufacturer's current printed instructions for attachment. Take care to ensure that no voids are created between insulation and substrate and between pieces of insulation. Stagger end joints of insulation a minimum of 300mm.
PARADIENE 20TS BASE SHEET (heat-activated) –
- Heat the back of the sheet to fully defeat the protective film and warm the adhesive stripes. Install the sheet by rolling out onto the insulation, adhered at the striped locations. Lap side joints 76mm and end joints 150 mm. Stagger end joints a minimum of 300 mm. Seal all end joints by heat welding.
PARADIENE 20TS SA (self-stick) –
- Install the base sheet by removing the protective paper on the underside and allowing the sheet to self adhere to the insulation surface. Lap side joints 76 mm and end joints 150 mm. Stagger end joints a minimum of 300 mm. Remove the protective strip on side joints and allow the joints to adhere. Seal end joints by heat welding and surface torch and roll all side joints.
PARADIENE 20 SERIES BASE SHEETS (ADHESIVE OR ASPHALT)
- (Insulation overlay is required) Install the base sheet by fully embedding in hot asphalt or adhesive. Lap side joints 76 mm and end joints 150 mm. Stagger end joints a minimum of 300 mm.
- Install base stripping as required. Consult the Construction Details section of this Manual.
HEAT WELDED CAP SHEET –
- Install cap sheet, fully heat welded to base sheet. Lap side joints 76 mm and end joints 150 mm. Stagger end joints and joints between plies of membrane a minimum of 300 mm
ADHESIVE APPLIED CAP SHEET –
- Install the cap sheet by fully embedding in adhesive. Lap side joints 76 mm and end joints 150 mm. Stagger end joints and joints between plies of membrane a minimum of 300 mm.
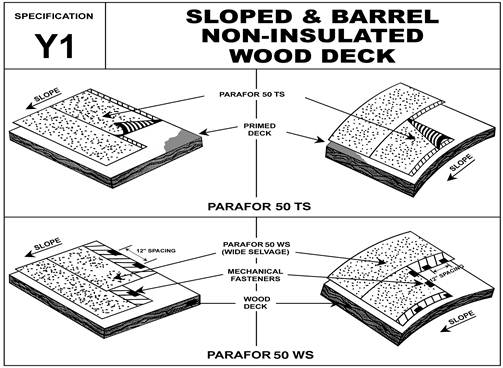
2.4 Sloped & Barrel Roofs
BASE STRIPPING PLY INSTALLED WITH MECHANICAL FASTENERS
- Install the base stripping ply around the perimeter and protrusions, dry. Extend the base ply 300 mm onto the surface of the deck. Lap side joints 87 mm and seal by heat welding. Mechanically fasten the base stripping to the deck at 300 mm o/c. Staggered. Consult Details section.
BASE STRIPPING PLY INSTALLED BY SELF STICK METHOD
- Prime all areas where base stripping ply is to be installed and allow primer to fully cure. Install self stick base stripping ply by removing the siliconized paper on the underside and allowing the sheet to self adhere to the previously primed surface. Extend the base ply a minimum of 300 mm onto the surface of the deck. Lap side joints 87 mm and seal by heat welding. Consult Details section.
PARAFOR 50 WS (MECHANICALLY FASTENED)
- Install the membrane dry, and mechanically fasten to the deck along the outside edge of the selvage at 300 mm o/c. Lap side joints 200 mm and end joints 300 mm and seal by heat welding. Heat weld the membrane to the base stripping ply wherever they coincide.
PARAFOR 50 TS (HEAT ACTIVATED)
- Prime the plywood deck. Heat the back of the sheet to fully defeat the protective film and warm the adhesive stripes. Install the sheet by rolling out onto the deck, adhered at the striped locations. Lap side joints 100 mm and end joints 300 mm. Stagger end joints a minimum of 300 mm. Seal all joints by heat welding. Heat weld the membrane to the base stripping ply wherever they coincide.
PARAFOR 50 TS SA (SELF-STICK)
- Prime the plywood deck. Install the membrane by removing the protective paper on underside and allowing the sheet to self adhere to the wood deck. Lap side joints 100 mm end joints 300 mm. Stagger end joints a minimum of 300 mm. Seal all joints by heat welding. Heat weld the membrane to the base stripping ply wherever they coincide.
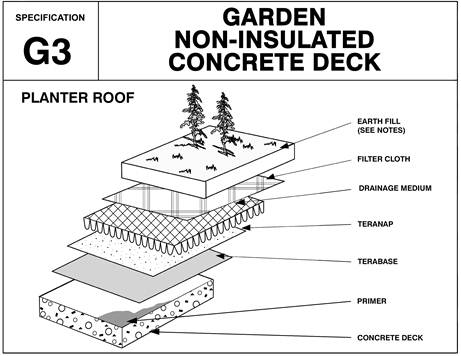
2.5 Vegetated Roof Assemblies
- Prime surface to receive membrane and allow to fully cure.
- Fully heat weld Terabase base sheet to the primed concrete substrate. Lap side joints 76 mm and end joints 150 mm.
- Install base stripping ply as required. Consult the Construction Details section of this manual.
- Fully heat weld Teranap cap sheet to the base sheet. Lap all joints 150 mm. Stagger joints between plies of membrane a minimum of 300 mm.
- Over Teranap membrane, install drainage medium.
- Install filter cloth and earth fill, to suit chosen Green Roof Vegetation system.

